How do I view Events?
Events are listed on the Events Screen. On the Events Screen, you can view and filter all Events that have been added to your system.
Note: To add, view, and edit events, an administrator on your accout must enable and set up the Events Manager Module. For ore information, see the article: What is the Event Manager Module?

- To get to the Events Screen, start by clicking "Records" on the top blue bar.
- A dropdown will open, select "Events" from the dropdown and you will be navigated to the Events Screen (shown below).
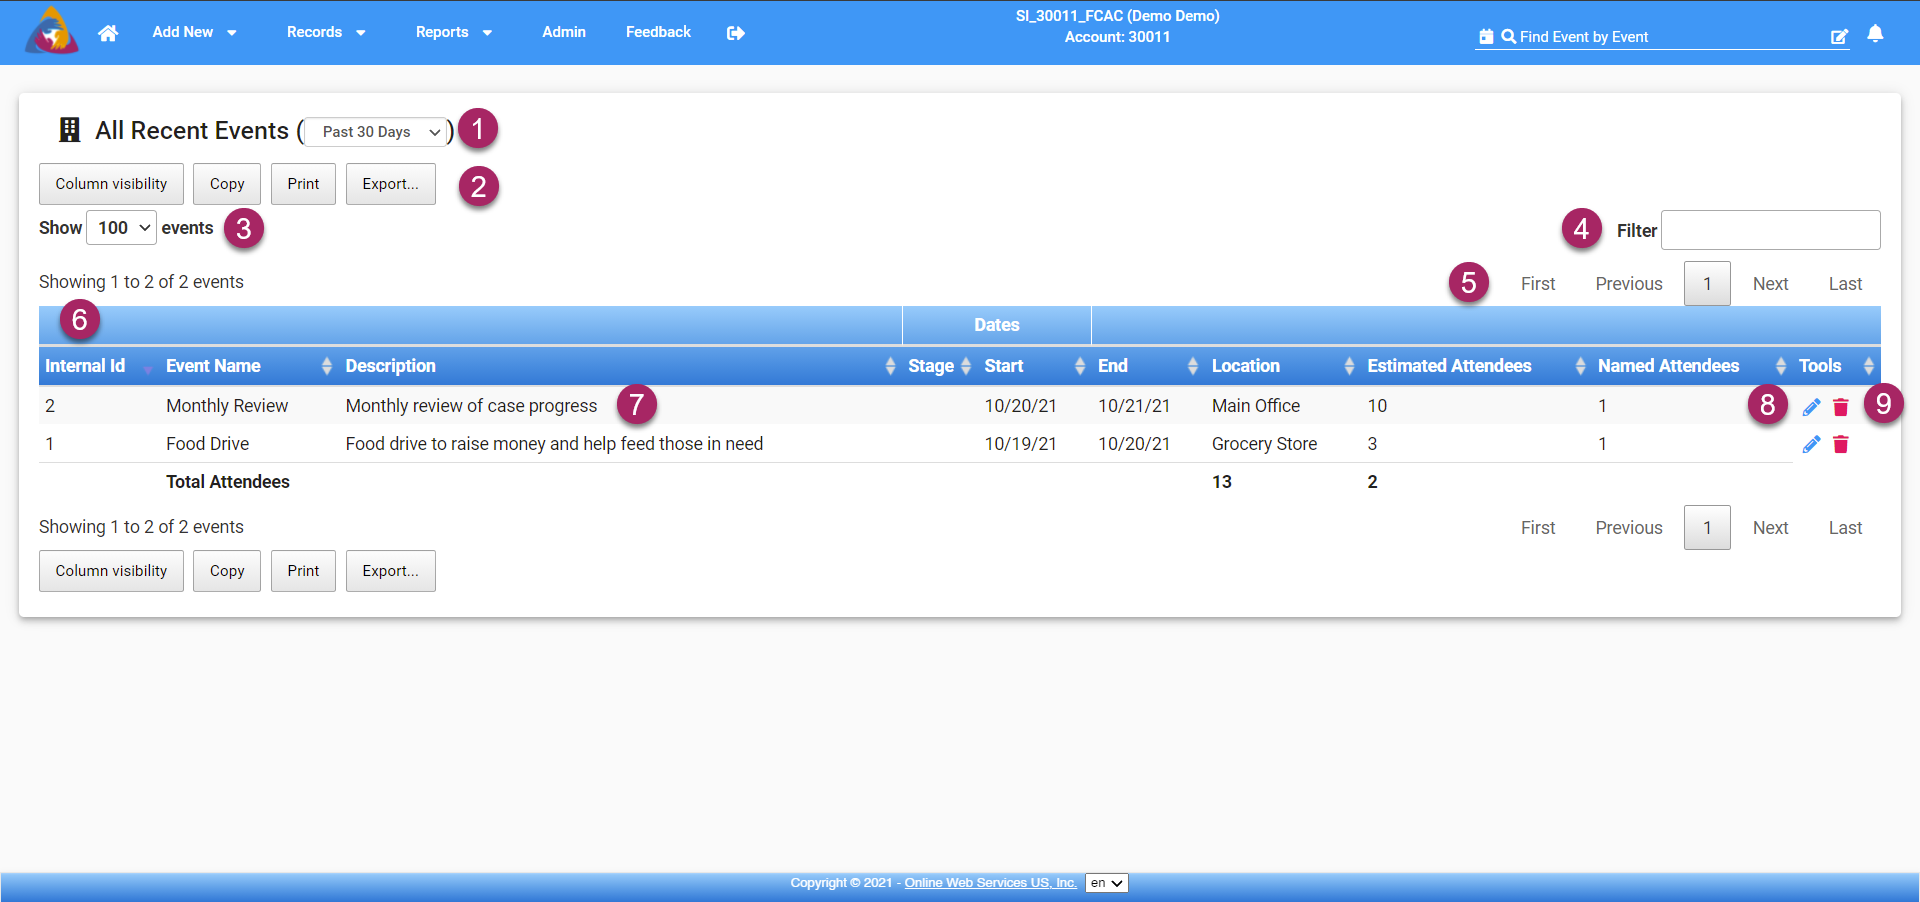
- At the top of the Events Screen, you will see "All Recent Events" followed by a dropdown menu in parentheses. This dropdown will allow you to filter the period of time for event records shown. The default is "Past 30 Days". If you click the dropdown you will be able to change the selection to "Past 60 Days", "Past 90 Days", "Past Year", or select a specific year.
- Moving down you will see 4 buttons: Column Visibility, Copy, Print, and Export. These buttons are available both at the top of the list as well as the bottom for easy accessibility. Each button will be detailed below.
- Column Visibility: The blue bar at the top of the list of events is separated into columns that display information about each event. The Column Visibility button will open a dropdown that allows you to select the columns of information you wish to display and which to hide. Click a selection from the dropdown to activate/deactivate the corresponding column.
- Copy: The copy button will copy all of the rows displayed on the page. They can then be pasted into a document or spreadsheet. If you are copying to a spreadsheet, the copied row will paste into separate columns.
- Print: Clicking the Print button will open a new window displaying the list of Events as well as open your computer's "Print Window". This gives you the option to save the list as a pdf to your computer or send the list to your printer.
- Export: The Export button gives you 3 options for exporting the list of events: CSV (Comma Separated Values), Excel, and PDF. Select the option you wish to download and a window will open allowing you to name the file and download to a folder of your choice on your computer.
- Next, you will see "Show ... events" with a dropdown field in the middle displaying a number. This allows you to specify how many events to show per page. The default is 100. Click the dropdown and you can choose to show "500" or "All" Events.
- On the right side of the screen, is a search bar labeled "Filter". If you are looking for a specific Event, you can type the name of the Event in the search field. As you type the list will filter to show results matching your search.
- On the right side of the screen, above the list of events, are 4 options for navigating pages of events. Each will be detailed below:
- First: If you are 2 pages or further into events, clicking "First" will take you back to the first page of events.
- Previous: If you are 2 pages or further into events, clicking "Previous" will take you to the last page. For example: if you are on page 3 and click "Previous" you will be taken to page 2 of events.
- After the "Previous" button, you will see a grey square with a number in it. The number shown is the current page of events you are on.
- Next: Clicking "Next" will take you to the next page of events.
- Last: Clicking "Last" will take you to the last page of events.
- Across the middle of the screen, you will see the list of events entered into your system. Each event is separated into its own row. Each row has columns that provide information about that event. The number of columns and shown information depend on settings you have specified for "Column Visibility" Clicking any of the column names on the blue bar above the list will organize the list of results based on that column.
- To view an event, click the row containing the event you wish to view and you will be taken to its Event Screen where you can view the event and make edits.
- Alternatively, you can click the blue pencil icon on the right side of the row and you will be taken to the Event Screen for that event.
- If you wish to delete an event you can click the red trash can icon on the right side of the event's row and it will be deleted.
